
So you just bought your first guitar… now what?
You just got home from the guitar store, or you just opened that fresh box that was delivered. You’ve never been more excited to begin your instrument journey. You pick up that brand new guitar, and it hits you: what comes next? Where do you even start?
I remember that feeling when I first brought home my beginner Yamaha acoustic guitar. I was so eager to dive in, but I didn’t even know where to begin.
First things first, don’t be intimidated! 🙌🏼 Follow these steps to get your guitar setup and yourself ready to play.

1. Learn the parts of your guitar
Body: The body of the guitar is the large, hollow or solid structure that houses the sound-producing components of the instrument. It typically consists of a top, back, and sides.
Bridge: The bridge is located on the body of the guitar, opposite the nut. It holds the strings in place and transmits the vibrations of the strings to the guitar's body, contributing to the production of sound.
Pickguard: The pickguard is a protective plate, usually made of plastic, located on the body of the guitar, underneath the strings. It helps to prevent damage to the guitar's finish from strumming or picking.
Soundhole (acoustic guitar): On acoustic guitars, the soundhole is a round opening located on the top of the body. It allows the sound of the vibrating strings to resonate within the body, producing sound.
Neck: The neck is the long, slender portion of the guitar that extends from the body to the headstock. It provides support for the fretboard and serves as the primary structural component for the strings and frets.
Fretboard/Fingerboard: The fretboard is a thin, usually wooden, flat surface that is attached to the neck of the guitar. Frets, small metal bars, are embedded into the fretboard at specific intervals to divide the neck into different notes.
Frets: Frets are thin metal strips embedded into the fretboard. Pressing a string against a fret changes the length of the vibrating portion of the string, thereby producing different notes.
Nut: The nut is a small strip of material, usually plastic, bone, or metal, located at the top of the neck near the headstock. It helps to maintain the spacing and height of the strings as they pass over the fretboard.
Headstock: The headstock is located at the end of the guitar neck. It contains the tuning pegs, which are used to adjust the tension of the strings and tune the guitar.
Tuning Pegs/Tuners: Tuning pegs, also known as tuners or machine heads, are used to adjust the tension of the strings, thereby tuning the guitar to the desired pitch.

2. Learn your open strings
A standard-tuned guitar has six strings. From the thickest to the thinnest string, they are usually named:
E, A, D, G, B, and E
You can also number them:
from the lowest-pitched string (6th string) to the highest-pitched string (1st string)
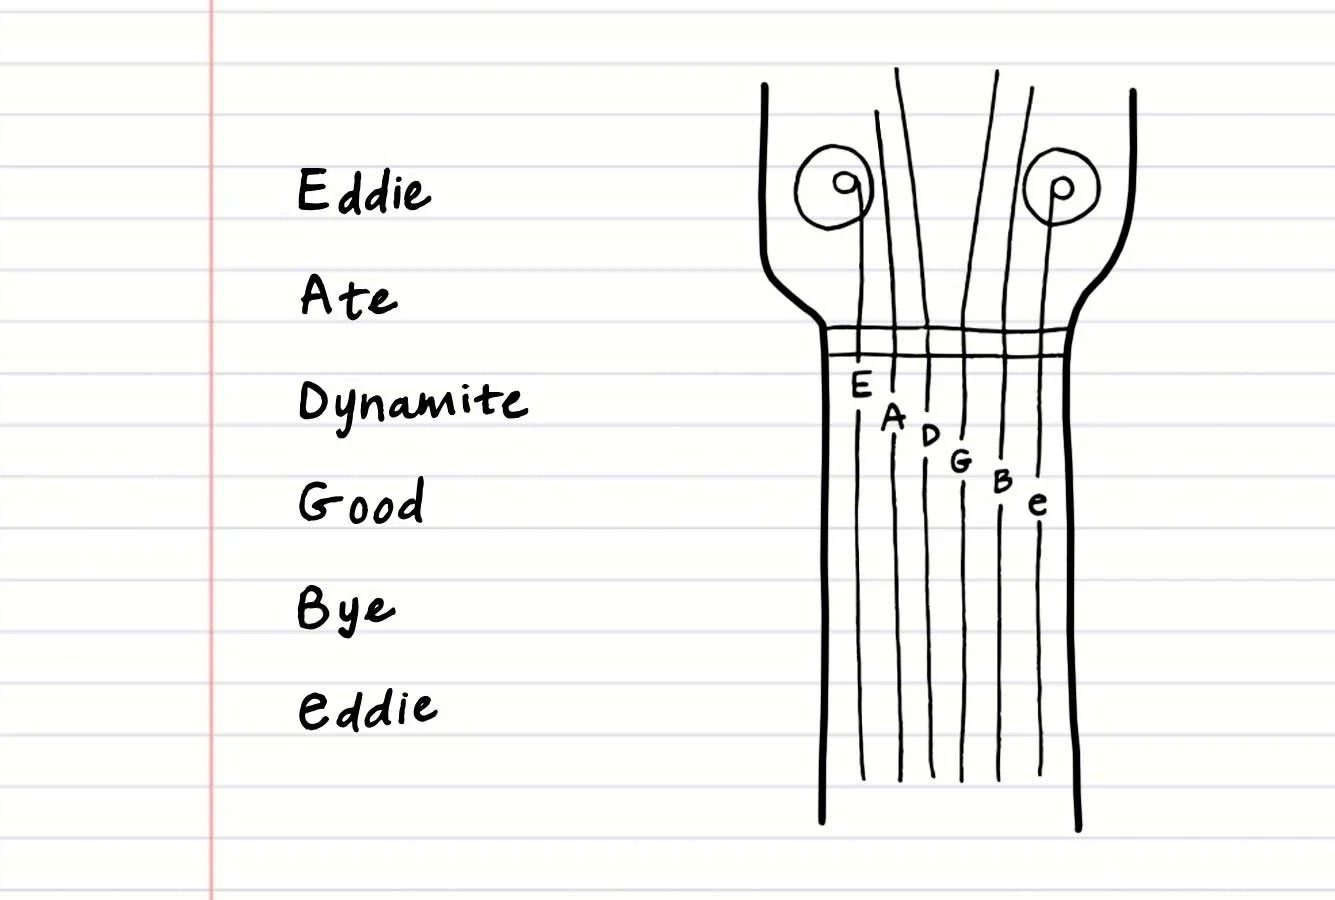
Memorizing a Mnemonic
Using a mnemonic device can help you remember the order of the strings. My favorite trick (which always makes me laugh) for remembering the string names in standard tuning is:
"Eddie Ate Dynamite, Good Bye Eddie"

3. Learn to tune
Find your preferred tuning method: You can use a dedicated guitar tuner, a tuning app on your smartphone, or an online tuner.
My favorite tuning methods:
Apps:
Clip On Tuner:
Turn on the tuner: If you're using a clip-on tuner, attach it to the headstock of your guitar. If it's a pedal tuner, step on the pedal to activate it. For smartphone apps or online tuners, follow the instructions to open the tuner.
Pluck the strings one by one: Start with the thickest string (6th string or low E string) and pluck it. Look at the tuner display to see if the pitch is in tune. The tuner will indicate whether the pitch is too low (flat), too high (sharp), or in tune.
Adjust the tuning pegs: If the pitch is flat, tighten the corresponding tuning peg to raise the pitch. If the pitch is sharp, loosen the tuning peg to lower the pitch. Make small adjustments and continue plucking the string until the tuner indicates that it's in tune.
Repeat for all strings: Move on to the next string (5th string or A string) and repeat the process of plucking the string and adjusting the tuning peg until it's in tune. Continue this process for all six strings, moving from the thickest to the thinnest string.
🎸
NOW, YOU’RE READY TO SHRED!
Contact LMA for lessons today and elevate your instrument journey.